Blue Flower

In the last article we covered the construction of the head area of the helicopter. In this article, we turn our attention onto the main frames and engine installation with a brief look at the two types of control that is associated with model helicopters, namely CCPM and mechanical mixing.

Main Frame assembly

I have mentioned before that helicopters have three types of main frame materials:-

  • GRP Plastic
  • Aluminium
  • Carbon fibre

Each material has both advantages and disadvantages.

GRP Plastic Frames

These frames, known as ‘plastic fantastic’, are generally associated with cheaper model kits, but although they are often cheaper, they offer amazing resilience to the riggers associated to model helicopters. Vibration is a common part of helicopter flying, and if we can reduce this vibration then the helicopter will give a long service life.

GRP frames offer excellent resilience to vibration, damping its effects on other parts of the helicopter. So what does GRP stand for? It stands for Glass Reinforced Plastic.

Advantages:

  • Relatively cheap.
  • Good vibration suppression qualities.
  • Mouldable into any shape.
  • Lightweight.

Disadvantages:

  • Threads can strip easily.
  • Frames can crack and they may be difficult to spot.
  • Impurities in the plastic can weaken the casting.
  • Expensive moulds are required for manufacturing thus large production runs are required by the manufacturer.

Top Tip 1:

If a thread strips in the GRP casting, a small amount of Cynoacrolite will repair the thread until the screw is removed. This process can be repeated but not indefinitely. I have successfully inserted a helicoil into the GRP frames as an upgrade and these have lasted many years, and by replacing the screw with am M3 cap head screw, I feel is a better solution anyway.


Aluminium Frames.

Aluminium frames are easy to manufacture as they are normally supplied as flat plates which build into a stacked frame design, they are accurately drilled and are cut into some elaborate shapes. Originally, these aluminium side frames only came in their natural colour, but recently, they can come in many different colours achieved by anodising the aluminium.


Advantages:-

  • Easy to spot if the frames are damages by lying them on a flat piece of glass.
  • Aluminium is a relatively cheep material.
  • Fixings are metal to metal, don’t forget to use threadlock!
  • Less work is required by manufacturers as the left and right sides are the same.
  • Can easily be upgraded to carbon fibre at a later date.

Disadvantages:-

  • They are very poor in vibration suppression.
  • Frames cannot be straightened as this weakens the material.
  • Aluminium has a tendency to shrink in cold weather.
  • Extra care is required to ‘square up’ the main frames.

Talking about aluminium shrinking in cold weather, have you noticed that the tail belt of a helicopter appears very loose on a cold day, but when you check the belt tension at home in a warm room, the belt tension is ok! This is due to the aluminium boom shrinking in the cold weather. This does not happen with carbon booms.

Carbon Fibre Frames

These are not only strong but they look fantastic. Again, carbon fibre side frames are manufactured in flat plates which lend themselves to the stacked frame construction.

Advantages:-

  • They look fantastic!
  • The frames are easy to tell if they are broken.
  • They are tolerant to vibration.
  • The frames are very strong.
  • Carbon fibre is very light.
  • Less work required by manufacturers as the left and right sides are the same.

Disadvantages:-

  • Carbon fibre is expensive.
  • The edges of the carbon fibre frames are sharp and have to be smoothed off.
  • Extra care is required to ‘square up’ the main frames.

Now, I have mentioned stacked frames. What does that mean I hear you ask? No, I don’t always have little voices in my head, it is a fair question. Stacked frames mean that there is a wide lower set of side frames that house the engine and fuel tank, and fitted above this (stacked on top) is a narrower set of frames that support the tail boom, main mast bearing holders and the top bearing support for the engine start shaft. This construction is required as the side frames are flat and the bottom set need to be wide enough to hold the engine between them. The two sets of frames are connected together with short spacers, some of which are hard to fix in place.

There is always an exception to the rule, and this time it is from Miniature Aircraft in the form of the Fury where the top and bottom frames are made from one piece of aluminium, or carbon fibre in the Extreme, which are very close together and a metal engine block extends out both sides of the frames to support the engine in place.

In the eighty’s and early ninety’s, models were made where the aluminium frames were bent to cater for the wider lower frames and narrower upper frames, but in the event of a bump with mother earth, it was difficult to determine if the frames were bent or the bend in the aluminium weakened the integrity of the material.

Now, GRP frames do not suffer from this problem as complex moulds are made and this offset between the top and bottom is easily catered for. A lot of the modern ‘plastic fantastic’ helicopters are so well designed that cooling shrouds for the heads of the engine are moulded into the side frames as one piece. The bearing housings are also moulded into the side frames, the ones on the Thunder Tiger Raptor are so well moulded, that the bearing fit is amazing, just put the bearing in one side and it stays there. If the same is done to a Hirobo Scaedu, the bearing falls back out until the two half’s of the frame are assembled together, this could result in the outer part of the bearing rotating which is not a desirable effect. In this case the bearing outer must be ‘glued’ in position with a bearing retaining compound.

When assembling the GRP frames together, the two halves are pretty much self aligning with each other. With the stacked frames, not only do you have to make sure that the side frames are parallel with each other but that the top and bottom sets of frames are parallel with each other! This can only be achieved by constructing the lower and upper frames on a smooth piece of glass using a set square. This is why stacked frames are usually associated with the intermediate to advanced fliers, and the ‘plastic fantastic’ GRP framed helicopters are aimed at the beginner.

Fitting the engine

Once the frames are assembled with all the associated bearings fitted, and the main mast is fitted to the main frames, the engine is now required to be fitted. In the “plastic fantastic’ helicopters, this is fairly straight forward as the gear mesh between the clutch bell and main gear is non adjustable, the only adjustment is how high the engine is inserted, too high and the clutch can be pushed up too tight in the clutch bell stopping the clutch disengaging. This is a common problem with the Thunder Tiger Raptor, but it affects most models in this class. The clutch bell must have a little vertical movement, known as float, in order for the clutch to work efficiently.


With the stacked frames, the engine mounting holes are usually slotted, as well as the top bearing block fixings for the engine. This is done so that any anomalies with the build can be adjusted out and the gear mesh can be adjusted between the main gear and the clutch bell pinion. This may sound straight forward, but think about it. There is movement on how high the engine can be mounted, the engine can lean forward or even be twisted side to side. Both the latter parts are very detrimental to the overall build of the helicopter causing parts to wear out quicker and thus cause unwanted vibration.

So be warned and take your time in lining up the helicopter frames and the engine installation.

Top Tip 2:

Use a thin strip of paper, I normally use a thin strip of a post-it-note, with the glue bit removed in case you were wondering, and run it in between the two gears. If the paper is cut by the gears, then the gear mesh is too tight. If there is little definition in the paper, then the mesh is too far apart. Consequently, if the paper is nicely pan folded, then the mesh is good, but don’t stop there, make sure that this definition is even across the paper pointing to a miss aligned engine!


Helicopter Controls Simplified

I mentioned at the beginning of this article that I would cover the two types of control systems associated to model helicopters. These are:-


  • Mechanical Mixing.
  • CCPM mixing.

These above systems control the movement of the swashplate. The swashplate is a clever design in which the bottom section remains stationery whilst the top section rotates on a large bearing turning a static motion into a rotating motion.

Mechanical Mixing

This basically means that there is one servo for each action of the helicopter movements namely the pitch, elevator and aileron. Mechanical leavers then mix these servos together stopping any interaction between each control. There are many different ways of achieving this, some methods are better than others. There are systems that allow the servos to rock in ball raced cradles, other systems use servos that are rigidly fixed relying on the ball joints on the control rods to take up the movements. The latter type tends to stress the servo output bearings, or bushings on cheaper servos, and I tend to stay away from this type of rigid control preferring the rocking cradle design.


CCPM

CCPM stands for cutting corners promotes misery. Only joking! It stands for Cyclic/Collective Pitch Mixing where all servos are directly connected to the swashplate and all servos move in the same direction for pitch, for aileron, one servo moves up, one moves down and the front servo stays still!


The transmitter works out the amount of movement each servo is required to make in order to achieve the desired result. The most common CCPM swashplate setups are 3 servo 120deg CCPM and 3 servo 140deg CCPM.

In 3 servo 120deg CCPM, as the name suggests, three servos that are directly connected to the swashplate where the three connections to the swashplate are 120deg apart. This type of control was not favored by many pilots as some interaction between the servos was very noticeable in flight. This was mainly due to the difference in the servos themselves. If for instance pitch is required and all servos are required to move up, any hesitation or difference in servo speed will introduce unwanted elevator and/or aileron movement as well. That is why it is imperative that the three servos are exactly the save type. With the advent of digital servos, this interaction is negligible, and the benefits far out strip the hassle of setting up the system mechanically.

The benefits are:-

  • The pitch is far more powerful as the loads are spread across three servos.
  • The pitch is faster as less strain is required thus allowing ‘Pitch Pumping’.
  • Fast and crisp elevator and aileron is achieved as less overall movement is required for each servo e.g. one servo moves up and two move down.

Negatives:-

  • Good quality servos are required to be of exactly the same type.
  • The initial mechanical setup must be accurate.

That just about covers it for this article, as I will cover actual setup in another article. I hope this answers some of the questions you may have had with regard to why there are so many different types of helicopter main frames and control systems, until next time when I will be covering the tail section and tail rotor control, have fun and keep looking at the models used at your local field for inspiration.

This is where the fun begins. As you may have noticed by now, I have a great passion for model helicopters, but I would like to point out at this early stage in construction about safety.


Cringe you may and boring I know but let’s put a few things into prospective first. Can you remember when you were little and you went to your local park and there was a roundabout, you always started out by trying to spin it as fast as you could, the closer you were to the outside, the more the roundabout wanted to throw you off, the closer to the centre, the less the effect. Now let’s apply the same principle to the helicopter’s rotating parts, namely the main rotor hub and tail rotor.


The main blades of a helicopter turn between 1400 rpm for a beginner to over 2000 rpm for 3D flying. Our old roundabout was only rotating about 30 to 60 rpm, depending how sick you felt! The tips of the main rotors can exceed 200 mph, and now is not the time to think, did I use thread lock on those bolts? when it is in the air hovering at head height! These are all impressive statistics, but don’t forget that the tail rotor turns about 5 times faster. The main point I am trying to get over here is that a model helicopter is NOT a toy and must be treated with respect; this is especially true during construction.


Most instruction manuals, both verbose and pictorial ones, will specify when and where to use thread lock on the screw threads.


Top Tip 1. Use thread lock on all metal to metal fixings i.e. when fixing metal screws into metal components.


When applying thread lock, you will only need a very small amount applied to the screw thread which has been de-greased, too much and the screw may need a heat source to remove the screw at a later date, and this on a plastic helicopter is not always practical.


I will cover construction of the main rotor head first as this is the most critical part of the helicopter, and as experience has highlighted, has caused many new to the hobby, the greatest of problems. This area can be further split into two sections:-

  • The main rotor grips and rotor hub.
  • The Flybar assembly.

The main rotor grips and rotor hub.

The main grips are linked together by a metal shaft known as a feathering spindle. This spindle passes through the rotor hub and is supported in the rotor hub by rubber dampers that will give the spinning rotor disk a degree of flexibility depending on the hardness of the rubber. When learning, these rubber dampers supplied are fairly soft to give the model a more stable flying characteristic, 3D pilots will use much harder durometer rubber giving a much crisper and faster feel to the helicopter. I have just inserted nylon dampers with a very thin rubber ‘O’ ring into my Raptor 50 to give the head a very crisp feel and this will eliminate the rotor blades from flexing towards the boom under extreme 3D conditions.


Top Tip 2. Lightly grease the feathering spindle as this will reduce vibration as the shaft centralises itself when the head is spinning and this will also reduce head noise.


The grease I use is a Teflon Fortified Grease obtainable from bicycle shops and is guaranteed not to thicken and can handle extremes of heat without changing its characteristics. The tub I bought should last me for many years to come and is a good investment.


The blade grips are supported on the feathering spindle by two ball bearings, and on the better kits, a thrust race is used as well to take care of the end loads (i.e. the blade grips can still rotate when the rotor blades are trying to pull the blade grips apart as in the roundabout scenario earlier). This thrust race causes a lot of problems for beginners.


Firstly, the thrust race is made up of three parts, not including the spacers that some models have, there is a back ring washer with a slightly larger internal hole that must be placed onto the feathering shaft first, closest to the rotor hub, then the thin cage that holds the balls which must be packed with grease, the instructions very rarely state this fact, followed by smaller internal diameter ring washer that is placed closest to the blade grips. I also install the ball and cage part, t hat must be packed with grease, so that the side which exposes the balls most is facing the centre hub.


Top Tip 3. How can I find out which hole is smaller? Trial fit the washers over the feathering spindle.


Once all the bearings, thrust races and blade grips are in place, don’t forget to use thread lock on the securing screws. This is one of the most important places to use thread lock and don’t forget to de-grease the screw thread first, you don’t want to throw a blade on your first flight!


The Flybar Assembly.

The next step is to assemble the flybar. This is a straight forward part of the building process as long as you take into consideration the following points:-

  • Length of flybar.
  • Weight of flybar paddles.
  • Alignment of flybar paddles.

Insert the flybar and before fitting the paddles, take time to centralise the flybar by measuring the amount exposed each side is exactly the same, when happy, only then fully tighten the grub screws using threadlock and then add the flybar paddles, again making sure the distance of exposed flybar is the same on both sides.


Top Tip 4. Weigh each paddle, if one paddle is heavier than the other, carefully remove the excess weight by sanding the entire surface of the heavier paddle. This will not change the dynamic balance of the flybar.


If the two paddle weights are very different, say over 5 grams, then send them back. I have only had this happen to me once, and it was obvious that there was a manufacturing problem.


Flybar Paddle alignment, although not as critical as main blade tracking, will reduce vibration and leads to a very smooth running helicopter. There are many aids on the market, and some helicopter head designs lend themselves for easier alignment than on others. So what is it you are lining up? Well, for a start, both paddles must be lined up with each other. Is this enough? No. In most cases the paddles should be lined up with the flybar control levers that are affixed to the flybar. In some cases, these control arms are angled down slightly, but by the same amount making the flybar paddles level.


The Flybar paddles are essential in the handling characteristics of a helicopter, the heavier the paddles, the more stable the helicopter is in the hover which is ideal for the beginner. The lighter the paddle, the faster the response rate is, making the model livelier. This quicker response will help 3D fliers as the helicopter will roll faster and stationery flips and rolls are a breeze!


Main Blades.

I will cover main blades in this section as this completes the head area.


The main blades of a helicopter support the total weight of the helicopter in flight just as a wing on a plane, but unlike a plane, the lifting section of the ‘wing’ can be changed just by bolting on a different set of blades.


Main blades are sold in sets of two ‘matched’ blades. So what does matched sets mean? It means that both blades not only weigh the same but each balance in the same place, therefore a helicopter rotor blade needs to be balanced statically and dynamically.


Statically just means that both blades must weigh exactly the same (e.g. 100 grams each). Now, if one blade is 100 mm long and weighs 100g and the other blade is 50mm long and also weighs100g, then if this set of blades is spun up on a rotor head, the model will shake itself to bits, why, well the dynamic balance of each blade is in a different place.


To find the dynamic balance point, balance one blade on a round pencil and at the point of balance, you have found the dynamic point of balance for that blade. This point is important when balancing a set of blades because it is at this point the lighter blade is balanced to find out where the weight is added to make both blades weigh the same.


So the procedure is to find out the lighter blade, say for example it is 3 grams lighter, now find the balance point of the heavier blade, say 50mm from the root. Place a mark on the lighter blade 50mm from the root and use this as a point of balance and add the 3 grams of PVC tape and add it at the point where the blade will balance. This will make both blades the same weight, static balance, and both will balance in the same place, dynamic balance, now the blades are a matched set. Please note, this procedure only relates to wooden blades as the modern techniques involved in producing carbon fibre blades is far advanced and the user just requires to bolt them on without checking their balance points. The blades will require to be tracked, but I will be covering this point in ‘Setting Up a Helicopter’ in a later issue.


Now, there are different types of aerofoil when selecting blades. The different types are:-

  • Semi symmetrical.
  • Symmetrical.
  • Mild ‘S’.
  • Reflex.

The list goes on so I will only explain three of the above types.


Semi Symmetrical Blades.
These blades have an aerofoil shape to the top side of the blade but have a fairly flat bottom section. This section gives the helicopter an efficient lift factor for a slow rotor speed which is suitable for the beginner and scale model. The faster the head turns, the more drag is produced causing the engine to work harder causing the engine to overheat. The slow head speed these blades operate in will lead to a slower reacting model giving the helicopter a more stable feeling. The disadvantage is that the helicopter can’t fly inverted as the blade is not designed to fly in that mode. This type of blade is often supplied made of wood in new model kits for beginners.


Symmetrical Blades.
These are also known as 3D blades as these blades have the same curved aerofoil section on both sides. Now you may be thinking that this will create more drag, well they don’t because the aerofoil section is not as thick, this makes the blades less efficient at creating lift but allows the blades to spun faster with less loading of the engine, this faster RPM artificially creates more lift and with a faster head speed, the helicopter becomes more lively lending itself to the 3D pilots and the blades will create lift which ever way up they are. Being a thinner section blade, not by much, but enough to make a difference in flight, blades need to be stronger, that is why most symmetrical blades are made from carbon fibre.


Mild ‘S’ Blades.
These are a half way house between the semi symmetrical and the symmetrical blades where the bottom of the blade had a small amount of lift compared to the top. This type of blade will perform loops, rolls and mild amounts of inverted flight but has the advantage of good upright lift ideal for learning auto rotations with, more about those later in the series.


That about takes care of assembling the head of your new model, in the next article, I will be covering the mainframes and engine installation together with the difference between mechanical mixing system and CCPM systems. I hope this has wetted your appetited, until then, have a look at your blades and have a go at checking their balance.

This month we will look at those essential extras, both field and workshop that are required to build and run a helicopter.

Field Essentials

First, let’s look at the field ancillaries. These are the bits that are required for starting the helicopter, and are often overlooked when purchasing that first helicopter.

The basics are as follows:-

  • a box for all the bits.
  • starter motor
  • starter wand (hex starter shaft)
  • 12 Volt battery power source
  • field chargers
  • tools

The Flight Box

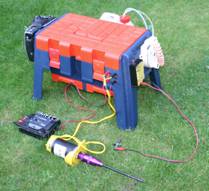
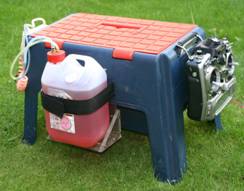
The flight box must be capable of not just holding all the equipment; it must be waterproof for that short shower, after all, our weather is not very predictable. It must also be lightweight and not awkward to carry from the car to the field. There are many flight boxes on the market but I find the red and blue tool boxes from B&Q cheap and adaptable, it even has a seat!


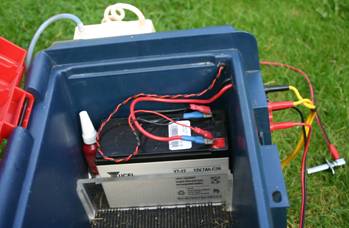
The three heaviest items in the box are the 12 Volt lead acid battery, the 12Volt starter motor and the fuel bottle. Customising your box to your specific needs is a great challenge, and if done right, will serve you well for many years to come, but as stated before, it must be luggable, so only carry the essential items to the field and leave the rest at home.

Top Tip1: The first bottle of fuel you purchase should be in a half gallon container, this is lighter to carry to the field than a full gallon and you can always top up the half gallon from the subsequent full gallon canisters you will purchase.

I have made a platform on my flight box for my 1/2 gallon fuel tank and used the strap from my mechanical fuel pump to support the fuel can. Talking of fuel pumps, I use a mechanical fuel pump that I have used for eight years without any problems. Other people down my flying site laughed at me as I manually cranked the handle to fill the tank to exactly full. Now most of them are on their third or fourth electric fuel pump, I do let them use my manual one when theirs fail!

Top Tip2: Simple is often best.

I have also made a 'U' shaped piece of plastic for holding the transmitter as well as fitting sockets to my box so that I can plug in my starter motor and a field charger at the same time, these are all wired back to the internal battery. All these things are cheap to do and make life a lot easier down the field.

Starter Motors

There are many starter motors in the market place and most are very reliable and will easily start a 30 size engine. The larger and more expensive starters are designed for the larger 90 size engines. Most starters come with a rubber cup at the end for starting planes but a starter wand with a hex ball head can be placed into this rubber cup that will start the helicopter engine.

Power Source

A 12Volt lead acid battery will be required with a minimum of 7Ah (7 Amps per hour) that will power the starter and power panel if fitted. Power panels can be purchased with connections for:-

  • A glow plug at 1.5Volts adjustable on a rotary control.
  • A connection for the starter motor.
  • A connection for the electric fuel pump which has a forward and reverse switch for filling or emptying the helicopter tank if you choose to take the electric pump route.


Field Charger

A field charger, although not essential when you first start out, is handy to increase air time for both the transmitter and the receiver pack. When you start flying you will probably only fly twice before you go home tired!

Field Tools

There are many tools that are required at the field, but please remember, you have to carry all these to and from your car each time you go flying. An essential list goes something like this:-

  • Glow plug Clip.
  • 1.5, 2.0, 2.5 and 3.0mm ball ended Allen keys.
  • Small flat blade screwdriver for adjusting the carb on the engine.
  • Phillips screwdriver.
  • A glow plug spanner.
  • Small adjustable spanner.
  • Thread lock.
  • Spare fuel tube.
  • Spare Glow Plugs.
  • Retractable knife.

This list is short but essential, there are further nice to have tools such as ball link pliers etc, but these items can be added at a later date.

Workshop Essentials

Now let’s look at those bits that are left at home to build and strip the helicopter.

Now I know many people have their favourite tools that they have had man and boy, but we are talking about a precision and smooth running helicopter here, so examine these tools for wear, after all, you don't want to damage your new pride and joy before you have had a chance to fly it. I have already covered the ball ended Allen keys and small screwdrivers, the tools covered here are things like pitch gauges, engine locking tools and washing up liquid! Yup, you read that correctly (don’t tell the missus); I will be covering this essential item in my further articles.

The tools that are required to build a helicopter are outlined at the beginning of most assembly manuals and will be a great starting point. Now I mentioned an engine locking tool and I hear you shout, why do I need to lock the engine? Well, when bolting on the clutch to the engine you are required to tighten the engine nut fairly tight, but the engine will rotate if it is not locked into a firm position. There are many different ways to do this.

Top Tip3: The method that I would recommend is one that is not publicised that much, it’s an official engine locking tool from OS engines. This tool fits most makes of engines and is inserted from the back plate of the engine and grabs the con rod and the crankshaft itself. This tool is reversible, one side covering 30 size engines and the other side covering 46 to 60 size engines. This allows the engine nut to be tightened in a safe and non-damaging way.

OS Piston Locking Tool.

DO NOT USE a piston locking tool that fits in the glow plug hole, all this will do is damage the head of the piston that is fairly thin, and distort the con rod. I doubt that an engine manufacturer will show any sympathy if you return a brand new engine with visible signs of this method! You have been warned.

Blade pitch gauges are a great asset to the beginner. This simple tool will help you to adjust the helicopter setting to achieve the correct conditions for that first flight especially if you can’t get an experienced flier to help you. Again, there are many on the market and all achieve the same result.

There is still a need for blade balancers for wooden ‘Kit blades’, but balancers are not required for most of the carbon fibre blades on the market today. Blade balancers will trim out both static (Still) and dynamic (rotating) imbalances on a set of rotor blades. Again this will be covered in a later issue. These balancers look like the scales of justice and are easy to use once the basics are understood.

Next is silicon sealant used for thinly spreading on the engine/exhaust joint. This will create a leak free and mess free joint, after all, the largest waste from the exhaust is the engines lubricant (oil) and this can leak out under pressure and cover your model (what was that about uses for washing up liquid, but don’t get caught washing down your model or your partner may show you other uses!). Silicon sealant is easy to remove and can withstand very high temperatures.

Threadlockers are essential when constructing, or repairing models. Loctite produce two types, green for high strength and pink for a lower strength. The high strength is used on the engine nut and on the tail rotor hub grub screws, and the lower strength is used on all other metal to metal fixings.

Cyanoacrylate (Cyano) can be used with metal to plastic fixings such as the metal screws into the plastic main frames. The cyano acts as a filler and when the screw is removed, it breaks up and does not cause problems, but in truth, I only use this method if the thread in the plastic is getting a little tired.

Top Tip4: Keep Cyano in the fridge, it lasts longer.

The subject of tools is vast as all tools are a must have (well that’s what I tell the wife!) but the main point of this article is to make you aware of the main tools required to build the model in the workshop (or the living room if you have an understanding partner!) and remember to only take the essential tools to the field

In the next article, we will look at what to do when you open the box of your new helicopter kit (I remember it well! Pure Joy!). Until then, have a browse at the tools listed on most helicopter websites, there are a lot and they are all tempting!


I have bought a few kits from new and they have all been a joy to build. It seems to give you a sense of achievement and, more importantly, a greater knowledge of the finer points associated with the helicopter. This new found knowledge will be imperative whenever the helicopter is required to be striped down for maintenance, for the addition of upgrades, or after that ill fated accident.

Most new helicopters come in a rather large cardboard box which weighs very little but always seems to cost a lot! The main reason for the size of the box is protection. Most kits these days come from the far east, therefore kits must be well packed to survive the journey. When the magical time comes to open the box, you are greeted with a load of plastic bags containing even more plastic bags. At this point, please do not be tempted to open any of these bags, but instead, find the instruction manual and read the instructions carefully. I am not trying to be a kill joy but the reason will become clearer later.

Instructions

These seem to come in two forms.

1. Verbose.

2. Pictorial.

The verbose method , used by Miniature Aircraft for example, uses an A4 book of around 90 pages or more and is sometimes backed up with a large 3D drawing sectioned off into rotor head, tail assembly etc and the manual will refer to this drawing during each step leaving little room for misunderstanding. This book is very descriptive and each section starts with a list of parts, together with their part numbers, the quantity and which bag number you will find them in. Next you will find a 3D sketch of the current assembly stage followed by anything up to 3 pages of written text backed up by further sketches to make the assembly process very clear. With this method, it is virtually impossible to make a mistake or leave out a construction step especially if you tick off each step once they are completed. As an example of this type of manual, here is an extract from the Miniature Aircraft's Fury Extreme manual explaining about installing the mainshaft and main gear:-

“Select two #0875-1 “Split” type mainshaft collars. Examine the collars. One end of each collar has a flat surface with a .03mm raised step near the bore. This end is always to face a ball bearing. Using this criteria, slide two split collars onto the mainshaft exposed below the upper bearing block. The upper collar should have it's flat surface (with step) facing up to the underside of the upper bearing block and the lower collar should “face” the bearing in the lower block. Slide the mainshaft further downward into and through the lower bearing block until about 6.0 - 7.0mm is exposed.”

The above is only step three in a sequence of 8 steps covering two full pages of text, and this is not including the 3D sketch! The manual is a work of art and a great reference source for later perusal, but each section must be read through twice before committing to assemble this stage of the model.

The pictorial version is the most common as less work is required by the manufacturers in translation for different countries. These instructions rely on pictures to show you how to construct the model, using symbols where necessary to inform you where to use grease, retaining compound (locktite) or glue (cyano). These are backed up with pigeon English sentences if further information is required.

E.G. “Attach the linkage rod to the parallel elevator linkage balls.”

Since the drawing did not point out the names of the parts mentioned above, I did not bother to try to understand what it referring to, but in all fairness, looking at the excellent picture, an explanation was not required.

Although this method works well, it can be very easy to miss a screw fixing or even leave out a part as it is up to you, not only to spot the part in the picture, but follow all the lines on the 3D picture to find out how the part is fixed, this problem is compounded if the part is fixed on the other side of the model not clearly shown on the 3D drawing. This is why it is best not to open all the plastic bags when opening the box.

The majority of kits use a method of each step in the construction having a set number that corresponds to a numbered bag. By emptying all these parts from that bag into a suitable container, you will know when the current step is finished as no parts are left over in the container. You can then proceed to the following step.

How manuals are split up

The pictorial types of manuals seem to follow a similar format. The first part informs the buyer hazards associated with radio controlled models. The second part informs you of which tools you will require together with the equipment you need to start the helicopter.

The next section takes you through the building sequences which are normally broken down into the following sections:-

  • Fuel tank assembly
  • Main Frame assembly
  • Main gear assembly
  • Washout assembly
  • Pitch control assembly
  • Main rotor head assembly
  • Tail rotor and boom assembly
  • Final fitment of all sub assemblies
  • Electrical installation
  • Canopy assembly

The forth section is helicopter setup and normally after that, there's a section on how to change certain parts without doing a total strip down. Kyosho cover this aspect very well and this often reduces downtime. The final section of the manual is often dedicated to a pictorial parts list and an upgrade section, which only goes to prove my comment in the first article about producing kits to a price sensitive market, upgrades are available for your new kit if the need arises.

quality of parts supplied

The kit contents for the smaller 30 size helicopters mainly contain plastic components which are manufactured by injection moulding. These parts will have the tell tail signs as 'flash' marks can be seen. This is where plastic enters the mould and is usually cleanly broken off these days, but in the past, these flash marks required to be trimmed back. This process is very reliable, but it is still worth trial fitting the parts together before securing them together.

Choosing a place to build

Choosing a place to build to your helicopter very much depends on the type of kit it is, if it is a plastic framed helicopter then you can construct the helicopter in the lounge on a tray (Partner permitting!), if the helicopter frames are aluminium or carbon, then you will require a flat surface, preferably with a piece of glass on top. This will aid in obtaining an accurate set of frames using a set square. Whatever surface you choose, make sure you have plenty of room and that you can continue the construction over several evenings without parts being disturbed.

Special equipment needed

I have already covered the tools required to construct and maintain your model, but here I will be covering tools specific to the model you have just purchased. These tools are sometimes supplied in the box and you only find them when you have finished constructing the model. This is why it is always best to read through the manual completely before starting construction. Miniature Aircraft supply Allen keys, clutch alignment tools and other special tools required to construct their kit. They don't however supply the Dial Test Indicator to align the parts up!

What next!

Now that you have the helicopter kit, it is worth having all the extra items that you will need before to start building, such as:-

  • Engine and Mufflers
  • Servo's
  • Radio receiver
  • Receiver battery
  • Switch harness
  • Gyro

Engines

There are many brands of engines; some are very good, easy to setup and give trouble free running, some are less fortunate! The rule of thumb is the more you pay, the better the engine. The most common brands are:-

  • OS engines
  • Irvine engines
  • Webra engines
  • Thunder Tiger engines

One thing to be aware of when purchasing an engine is that it must be a helicopter specific engine. These engines have a larger head heat sink and a dedicated carburettor giving a very linear throttle response across the whole RPM range. The engines are also designed to run on a higher nitro methane content that boosts the engines output.

You will also require a suitable exhaust. These exhausts come generally in two formats:-

  • Mufflers
  • Tuned Pipes

As the name suggests, mufflers just quieten down the engine, some do have mild performance enhancements, but if the muffler is supplied with the kit, then it is only designed to quieten the model which leads to a degree of degradation of the engines performance. This is not a concern when learning to hover, but when starting out in circuits, power can be handy!

Relatively new to the market are the Zimmermann mufflers, they are made of stainless steel as opposed to the other brands that are aluminium. Stainless steel is far easier to clean as most oven cleaners will remove the brown exhaust residue that sticks to them caused by the caster oil present in the fuel.

Tuned pipes on the other hand, can add a great deal to the engines performance by balancing the back pressure to the two stroke engine. Although this method sounds great, many factors have to be taken into account from length of tuned pipe, type of fuel used, the type of glow plug, engine speed required etc. In fact, it is very much a black art and there are very few articles covering this subject. Therefore, for a beginner, it is best to use a muffler.

Electrical bits

The next items on the list cover such things as servo's, receiver, and receiver battery and switch harness; this can all be supplied together with the transmitter. Choosing a transmitter is very much a personal choice which comes down to price, what other people use down your local flying site and how comfortable it feels in the hand. The leading brands are:-

  • JR
  • Futaba
  • Sanwa (Airtronics in America).

Note: Most sets can be linked together, known as “buddying up”, via a cable and this allows an experienced pilot to take control of your model if you get into difficulty. This function is best used between like makes of transmitter i.e. Futaba to Futaba.

Gyros are last on the list. The purpose of the gyro is to help keep the tail of the helicopter under control stopping it swinging due to wind or counteracting torque generated from increased pitch and engine speed. A few years ago, you could only purchase mechanical gyros, today, piezo gyros have taken over the market. These piezo gyros come in two forms:-

  • Heading lock.
  • Yaw rate demand (Non heading lock).

Heading lock gyros are very good as they will keep the tail pointing in one direction, but if you move the tail stick on the transmitter, then the tail will obey. In yaw rate demand, if you move the tail stick on the transmitter, the gyro will detect this as an unwanted movement and the gyro will try to counteract your command.

Heading hold is very good but does require great understanding when setting up, which I will cover in a later article.

So there you have it, it is always best to have all the parts you require to assemble the helicopter before you start as this will keep the building continuous. Having to wait for, say, the engine before the next step can be completed is very frustrating.

In the next article, I will be giving tips on each assembly stage. Until then, have a look for your preferred radio equipment.


Choosing that first helicopter can be quite a daunting task. You may have something in mind, you may know someone who used to fly and has an old helicopter in their loft or, you may have gone to your local flying site and been totally confused by the choice regarding size and type suitable for learning.

Basically the choice comes down to two categories; will your first purchase be a new helicopter or a second hand one? The second choice will be the size and type of helicopter?

New or second hand?

Lets look at the first part, new or second hand. Second hand helicopters can offer very good value for money but there are many pitfalls along this route which can crop up.

  • Firstly, how old is the helicopter and are spares still easily available?
  • If the helicopter is a current model, always ask why is it up for sale?
  • Is it because it is looking tired and well used or are they moving up to a larger helicopter?
  • Even if the helicopter is a current model and airworthy, are the electrics supplied with the model ok?
  • Are the servo's new or have old ones been put in to sell the model?
  • How old is the receiver battery, will it require replacing?
  • Is the gyro in the helicopter solid state (as the majority are these days) or is it an old mechanical gyro?

Unfortunately the list of questions goes on. Now I am not saying all second hand models are bad value for money, but for a beginner that is new to this hobby, it can be hard to see the wood for the trees. My advice on buying second hand is to ask to see it fly and/or take someone along with you who knows about helicopters.

To give you an idea of the problems, a guy turned up to my local field with an old Kalt Cyclone which had an old 60 size engine that required a belt to start it, an old method which is not favoured these days. The Helicopter must have been 10 to 15 years old and the chap wanted to learn on it. No one down the field wanted to test fly the helicopter let alone teach someone on it. The chap was adamant that he was going to learn on it and he seemed keen enough and listened to all the advice he was given. It took several visits to the club before it was in a good enough state to fly, this in itself would have put most people off.

The helicopter finally rose into the air requiring a lot of adjustments to both the helicopter and the transmitter. Although the helicopter was finally flying, it was not as stable in the air compared to the more modern helicopters, but the owner was happy. The mechanical gyro kept the tail lively as the flywheel in the gyro would slow down and then speed up. At this point I re-stated the fact that I was not happy using old receiver batteries and just as I mentioned this, the helicopter tilted to the side and hit the ground and beat itself to death.

A post mortem did indeed highlight that the battery was old and therefore did not hold a charge despite it being checked with a battery tester before the flight. The helicopter could not be rebuilt as spares are very hard to come by.

In this day and age of the internet, EBay is another source for that second hand purchase, but it is very much buyer be aware! Remember you will not be able to see it fly or poke around it.

Buying a new helicopter overcomes many of these disadvantages, and you can tailor it to fit your pocket. Most of the modern helicopters, especially the 30 size, are designed for the beginner and they are more than capable of taking the learner from the first hops into that elusive 3D flying (what can be flown normally, can be flown inverted). As long as it is well constructed, and tips on this will be covered in a later issue, then you should have less of a worry the first time you go down the field for that first flight.

With a new model, people down your local flying club will be more familiar with it and will be more willing to help you set it up which will save you time and get you airborne earlier. Many magazines I have read are very reluctant to say that brand 'X' is the better helicopter to purchase, but in truth, it is best to buy the brand that is used at your local field. In my opinion, the two which are seen more commonly down local clubs are the Hirobo Sceadu 30 and the Thunder Tiger Raptor 30, both can be upgraded to a 50 size at a later date by purchasing an upgrade kit. The Raptor 30 does have cheaper spares and since I have owned both, I continue to fly my Raptor 30, now in a 50 form, and learn all my new 3D manoeuvres on it before trying them on my larger model.

It really does come down to local club knowledge and ease of purchasing those spares and upgrades. All 30 size helicopters have an Achilles heel, the 30 size market is very fierce and very price sensitive, so manufacturers make certain non-critical parts to a cheaper design, but offer an upgrade part that will correct this issue which can be purchased at a later date.

There are many smaller companies that manufacture 3 rd party upgrades, and in a future article, I will cover these upgrades, both those that are essential and those that just look good! This is where the larger models score as very few upgrades are required, but it is reflected in the price for the kit initially.

Which type and size of helicopter should you consider?

Well, this area is expanding all the time, gone are the days when the choice was a 30 or a 60, now there are 30's, 50's, 60's, 80's and 90's! So what do these numbers mean? They actually refer to the engine size where a 30 is a 030 in 3 or 5cc engine with a rotor diameter of around 1.2 meters, a 60 is a 0.60 in 3 or 10cc engine with a rotor diameter of around 1.3 meters and a 90 is a 0.90 in 3 or 15cc engine with a rotor diameter of around 1.5 Meters.

Now, there are two main areas that just might help you in your choice and they are price of spares and fuel consumption.

First, the 30 size market is, as mentioned before, very competitively priced in terms of both model and spares, whereas the 60 and above are often more expensive to purchase the kit initially, as well as paying a higher price for the spares which can get bent or broken in the early stages of learning. This is due in part to the physical size of the 60. Larger helicopters impose greater forces therefore the frame and the control system must be capable of withstanding these forces, so a higher specification model is required, even the servo’s that control the helicopter will cost more as a higher pull rate (measured in Kilograms) is required to move the rotor head.

The other area is the fuel consumption: a 30 size helicopter is very good and lasts between 15 to 20 minutes on a well setup and run in engine as opposed to 10 minutes on a 90 size, now consider the size of the fuel tank, the 30 is about 300cc where the 90 is about 500cc, and at about £17 a gallon of fuel, I will let you do the maths.

Now, when learning, a 30 size is cheaper to purchase, is cheaper on spares and more economical, so why do people start with 60 size helicopters? Well to tell you from my experience they are few and far between as most people do start on modern 30 size helicopters and then convert them to a 50 size for more power later on when the basics of flying is under their belts. However, the 60 size is more stable to fly and is less susceptible to the wind than a 30 but its larger appearance in close proximity to you when you first start your hovering skills can be a little daunting.

Anything above a 60 is aimed at the advanced pilot craving that faster response and requiring more power for that new 3D manoeuvre.

Finally, as for type of helicopter, I am referring to a scale helicopter or a pod and boom type. The pod and boom type is more suited, and cheaper, for learning on as you don’t have to keep remaking those lovely scale parts that personalise your scale model if you have an accident. Once you have mastered the basics, and you want to try your building skills at scale helicopters, then this avenue can be explored.

In the next article, we will look into what is required to build and run a helicopter, until then, visit your local flying site and find out what helicopters they fly, most pilots are proud of their machines and are willing to talk about their model and the upgrades they have used, so take advice from the people you will be flying with in the future. Till next time...